
While tossing myself into my current position there was really not much time to slow down and take in the scenery. From day one we have been non-stop on increasing efficiency and production. But during the fun whirlwind I have noticed that something in the brewery seemed to be staring me down on a day-to-day basis.
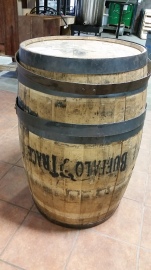
White River currently has a small inventory of 16 oak barrels sitting on racks in our event space, most filled with beer, some waiting to be filled with beer. But there was an odd man out who I couldn’t stop thinking about. Moved from corner to corner and looking dry and busted, sits a beautiful oak bourbon barrel that once held the great bourbon Buffalo Trace. Some of the hoops around the barrel have fallen to the floor around it, some of the staves are crooked and uneven, and the sad look of loneliness and despair gleams from the oak. It was once a warrior who held one of the great bourbons for many years, now it has been cast aside to await its fate as a flower planter or even worse…. a table!
 My wife and I are expecting our first child and couldn’t be more excited. We are nearing the end of pregnancy and decided to take our Christmas/pregnancy photos at the brewery. When finding spots to use as backdrops I noticed the barrel and recommended we use it. We took several shots of us leaning, sitting on, and near the barrel. When photos were done we made our way home, but the barrel was still on my mind. (Don’t tell my wife)
I started researching more about Buffalo Trace bourbon. Being as I’m not a whiskey drinker, I only knew of what I hear other people say- usually that it is great bourbon. After learning that all of their whiskey stays in the barrel for 8 years the wheels started turning.
The great thing about being obsessed with something is that you learn all you can about the subject, not to impress someone or to get ahead, you just love learning about it. My love for brewing is great, but my love for oak and brewing is greater. My true creative passion lies in sour beers. Most all sours are aged in oak. This being the case I went out of my way to study oak as much as I could. In doing so I have found many tips and tricks, but none of which can truly prepare you for what having a barrel is really like. The real learning comes from the oak itself. You have to touch it, smell it, and become one with it. I currently have a 5 gallon oak barrel I have used for homebrewing, I learned a lot from that little barrel, knowledge that can’t be taught or explained.
Once I arrived at work the next day I immediately went to work on the barrel, my goal being to save the oak and return it to its warrior status. If this had been any other barrel I would have written it off. For the methods I will describe I do not recommend trying on a dried up barrel that once held wine or cheap spirits. When I say cheap, I really mean short aged spirits. The only confidence I have is that this held a strong spirit for so long. Any other instance and I would be very worried about mold or wild yeasts entering the barrel. So don’t run out to the front porch and grab that decorative oak barrel that’s been sitting outside for 9 years.
The first step is to put the hoops back around the barrel. I find a broken piece of pallet wood that is just the right size to beat slowly down the hoop in a 360 degree circle. This is a slow step that could become frustrating. As one side goes down it loosens the other side and that hoop falls to the ground. Patience. Once they are close to their original spot, I take a chisel and slowly hammer them further. They will most likely not be back to the original spot. I tap on the outside hoops making sure they are even with the staves on the end. Now it is starting to look like a champ again.
The next step is to swell the barrel, the objective is to swell the wood and allow it to tighten itself into the hoops and close any potential holes. My concern with doing this is how long it has been empty. No one around the brewery knows how long it has been there or even who brought it. It never held beer there either. Someone speculated it’s been there for at least two years! Empty the whole time. There are many ways to swell it, I know several but I did one that just came to me in the moment so I will go over that one.
I don’t want to use water at first because I know it will come leaking out like a watering can. I then think of the brewhouse and the steam shooting out the back of the it through an exhaust stack that ends a few feet above the floor. Another light bulb. Luckily the barrel fit just under the stack and with some maneuvering and with a pallet underneath I am able to position it just inside the bung. I turn the steam on full blast and boil some water I am heating up for a brew day anyway. Like magic the steam shoots out and into the barrel. I let this go on for about two hours. It let in what seemed to be just the right amount, without dumping a bunch of liquid inside.
After the first hour I begin lightly tapping the barrel around all the staves to slowly let them move into position. Doing this allows the shallower staves to squeeze out and become level with their counterparts. I repeat this step several times through the steaming process.
Once I feel enough time had passed and the vessel can sustain liquid, I move it out and filled it with the same water I had been heating. I add small amounts at a time making sure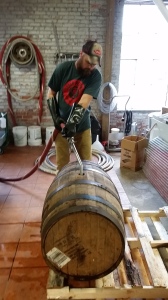 nothing is going to pop off and allow boiling hot water to rush all over the brewery and myself. When I feel comfortable that it could hold it all, I top off the remaining barrel. To my surprise, there are only small leaks around the heads. I let this sit for the remainder of the day and the leaks slowly closed up as the barrel swelled more and more. I periodically tap the barrel all over with my rubber mallet ensuring the wood slides into its natural spot.
 Finally, I want to make sure there is no wild yeast that have gotten inside the wood, so after the hot water has done its job, I fill the barrel with cool water and add a storage solution of 2 grams/liter of potassium metabisulfite and 1 gram/liter of citric acid. This solution will kill off any potential risk of infection and keep the barrel hydrated. This step is important if you wish to store “clean” beers in the barrel. I will allow this to sit for up to a month before feeling confident enough to put beer inside the vessel.
At the end of the day, after everyone else has left the brewery, I walk around my beloved barrel and stare in amazement. Then to my own surprise, I begin hugging it. Remember the scene is Jurassic Park where Ellie Sattler and Dr. Grant find the triceratops sick during the car ride, he lays on her in amazement and just feels her breathe. This is the moment I had with this barrel, although oak isn’t as cool as a dinosaur. But I think of the history of the barrel and what it went through to get here. It is truly a craft, beginning with the craftsmen who carve the staves, to the distillers who age the bourbon, and to the brewer who won’t let it stop there.

